DEX Safety 101: Approvals, Permit2, Revoke Workflows and Bridge Risks (Practical Guide)
Decentralised exchanges (DEXs) give you something centralised platforms never can: direct control over your assets. But that control cuts both ways. Every signature, every token approval, every bridge transaction is effectively you editing your own bank’s rules in real time. Get it right and you get fast, permissionless trading. Get it wrong and your “permission” can let a malicious contract drain your wallet while you sleep.
This guide walks through DEX safety from a practical, hands-on angle. We will cover how approvals and Permit2 actually work, how to use revoke workflows sensibly, why bridges are such a common target for exploits, and how to put everything together into safer trading workflows.
We will assume you are already comfortable with basic crypto concepts and self-custody, and want a deeper, more practical view of risk – the kind of nuance that doesn’t fit in a three-tweet thread.
What Problem Does DEX Safety Actually Solve?
On a centralised exchange, you delegate security to a platform. You worry about passwords, two-factor authentication, maybe withdrawal risks from exchanges, but you do not personally sign low-level on-chain instructions. The exchange’s systems and policies sit between your funds and an attacker.
On a DEX, you are the policy engine. Your wallet’s private key is the root of trust. When you:
- Approve a token for a DEX router,
- Sign a Permit2 message,
- Bridge tokens to another chain,
you are defining the rules under which smart contracts may move your assets. The problem DEX safety solves is simple but brutal:

How do I get the benefits of permissionless trading without accidentally giving a malicious contract ongoing permission to empty my wallet?
The answer lives in three areas:
- Understanding approvals and Permit2 at a conceptual level.
- Using revoke workflows as “access control hygiene”.
- Building safer patterns for bridge usage and cross-chain moves.
Threat Model: What Can Go Wrong on a DEX?
Before worrying about specific tools, you need to understand the types of incidents we are trying to prevent. Common patterns include:
- Malicious token approvals: You approve a token for a fake DEX or scam contract which has logic that can drain your entire balance.
- Unlimited allowances: You approve “infinite” spending limits, so if the contract gets hacked later, it can spend everything.
- Blind signing: You sign Permit2 or other typed-data messages you don’t understand, granting spending rights to the wrong contract.
- Bridge compromise: A bridge you use is exploited, so the asset you receive on the destination chain is effectively worthless, or your funds are locked.
- Operational mistakes: Sending tokens to the wrong chain, using the wrong gas asset, or confusing lookalike tokens and routers.
All of these incidents are amplified if your main holdings sit in a hot wallet. If you still need to tighten up how you store your keys, it is worth revisiting your wallet seed phrase security and ensuring your backup and recovery model is robust before you start optimising how you use DEXs.
Token Approvals: The Core Building Block of DEX Safety
Every time you trade an ERC-20 token (or equivalent on EVM-compatible chains) in a DEX like Uniswap, you typically follow this pattern:
- Your wallet sends an
approve()transaction to the token contract, giving a DEX router permission to spend up to a certain amount. - Then you call the DEX’s
swap()or similar function, and the router pulls tokens from your wallet, within that allowance.
Approvals are not inherently dangerous. The danger comes from:
- Approving the wrong contract.
- Approving too much value for too long.
- Forgetting what you have approved over time.
What Your Wallet Shows vs What the Chain Actually Does
Most wallets show a simple “Allow DEX to spend your tokens?” prompt. Underneath, this is writing data into the token contract’s storage, essentially an entry in the allowance(owner, spender) mapping.
| Wallet Prompt | On-Chain Action | Risk if Misused |
|---|---|---|
| “Allow DEX to spend 1000 USDC” | approve(spender=DEX_router, amount=1000) | Router can move up to 1000 USDC until you reduce or revoke the allowance. |
| “Allow DEX to spend unlimited USDC” | approve(spender=DEX_router, amount=2^256-1) | If router or its upgrade becomes malicious, it can drain your entire USDC balance at any time. |
| “Allow this contract to spend token X” (scam site) | approve(spender=scam_router, amount=unlimited) | Contract may immediately call transferFrom and move all of token X out of your wallet. |
From a safety perspective, you should treat approvals like standing direct debits from your bank account. They are not one-off actions – they are ongoing permissions, and you need a process to review and clean them up.
Common Approval Pitfalls
Over the years, I have repeatedly seen the same mistakes, even from technically strong users:
- Using one “everything wallet”: Trading, NFT mints, airdrop claims and long-term holdings all sit in one address with dozens of approvals scattered across it.
- Default unlimited approvals: For convenience, people accept “max” allowances so they do not need to approve again – but this creates long-lived blast radius.
- Ignoring testnet vs mainnet: Users approve on the wrong network or misread the chain, which can make debugging and revoke attempts messy later.
- No revocation habit: There is no regular process to review and revoke unused allowances, so they accumulate silently.
Some of these can be mitigated by wider operational discipline – keeping your main holdings in cold storage, understanding the difference between hot and cold wallets, and using dedicated “burner” wallets for high-risk interactions.
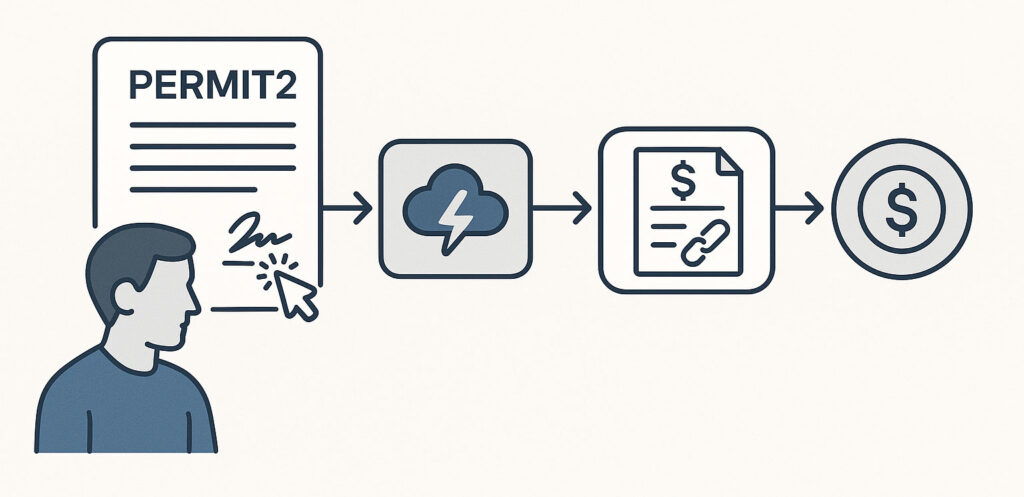
Permit and Permit2: Gas Savings with Extra Sharp Edges
To reduce the friction of separate “approve then swap” transactions, newer standards introduced meta-approval flows using signed messages instead of on-chain approval transactions.
- Permit (EIP-2612 style): You sign a message which allows a spender to set your token allowance via a relay transaction.
- Permit2 (popularised by Uniswap): A more flexible system that centralises allowances in a Permit2 contract, enabling permit-like flows across multiple tokens and protocols.
Conceptually, this changes the user experience from “I send an approval transaction” to “I sign a permit message and a dApp submits it on my behalf”. The security details, however, become more subtle.
Approvals vs Permit vs Permit2 at a Glance
| Mechanism | How It Grants Spend Rights | Typical UX | Attack Surface | Control & Transparency (★) |
|---|---|---|---|---|
Classic approve() | On-chain transaction from your wallet to token contract. | Send approval, then perform swap. | Scam contracts, unlimited allowances, router exploits. | ★★★★☆ (clear, but often unlimited) |
| Permit (EIP-2612) | Signed message lets spender set allowance via relay. | Sign permit, then swap in a single flow. | Blind signing, re-use of signatures, spoofed domain prompts. | ★★★☆☆ (efficient but opaque to many users) |
| Permit2 | Central contract mediates allowances across tokens. | One-off setup, then many gas-efficient interactions. | Complex revocation, central contract exploits, misconfig. | ★★★☆☆ (powerful, but harder to reason about) |
The Permit/Permit2 model is not “less safe” by default. In many cases, it can be safer, because the protocol can enforce expiries and per-signature limits. The risk is that most users treat these signatures as noise and click “Sign” without understanding the scope of what they are granting.
Common Permit/Permit2 Misconfigurations
- Long expiry times: Permit signatures that remain valid for months or years, rather than minutes or hours.
- Over-broad scopes: Allowing a spender access to more tokens or higher amounts than necessary for the immediate action.
- Reused nonces or signatures: If a dApp reuses a signature unexpectedly, or if its relaying logic is compromised, permissions can be misapplied.
- No central view of allowances: Users have no idea which protocols have valid Permit2 approvals at any point in time.
Your operational goal should be to keep Permit2 usage scoped and time-bounded, and to integrate Permit2 allowances into the same review process as classic approvals. The mechanics differ, but the principle is the same: short-lived, narrowly scoped spending rights wherever possible.
Revoke Workflows: Access Control Hygiene for Your Wallet
Regardless of whether you use classic approvals or Permit2, you need an ongoing process to review and revoke unused permissions. Think of this as cleaning up long-forgotten “keys under the doormat”.
What Revoking Actually Does
When you revoke an allowance, you are usually performing one of two operations:
- Calling
approve(spender, 0)on the token contract, effectively removing the spender’s ability to calltransferFromon your behalf. - For Permit2-like flows, invalidating or overwriting stored allowances or nonces so that existing signatures no longer grant rights.
Revoking does not roll back past transfers. It only prevents future use of that allowance. That is why it works best as a proactive hygiene measure, not a reaction after a draining transaction has already happened.
Practical Revoke Routine
A simple and effective routine I often recommend is:
- Separate wallets by role. Use a high-value cold wallet for long-term storage, and one or more hot wallets for daily DEX usage.
- Monthly review of approvals. Once a month, run a review of token allowances for your active hot wallet, and revoke anything you no longer need.
- Event-driven reviews. After any high-risk action (new protocol, new bridge, obscure NFT mint), immediately review and, if necessary, revoke approvals associated with that contract.
- Cold storage discipline. Your long-term holdings should rarely gain new approvals – if they do, add those assets to your migration to cold storage tips playbook to ensure they are moved back out of risk quickly.
Combining revoke workflows with basic operational security – such as following well-established tips to avoid getting hacked – sharply reduces the attack surface of your DEX usage.
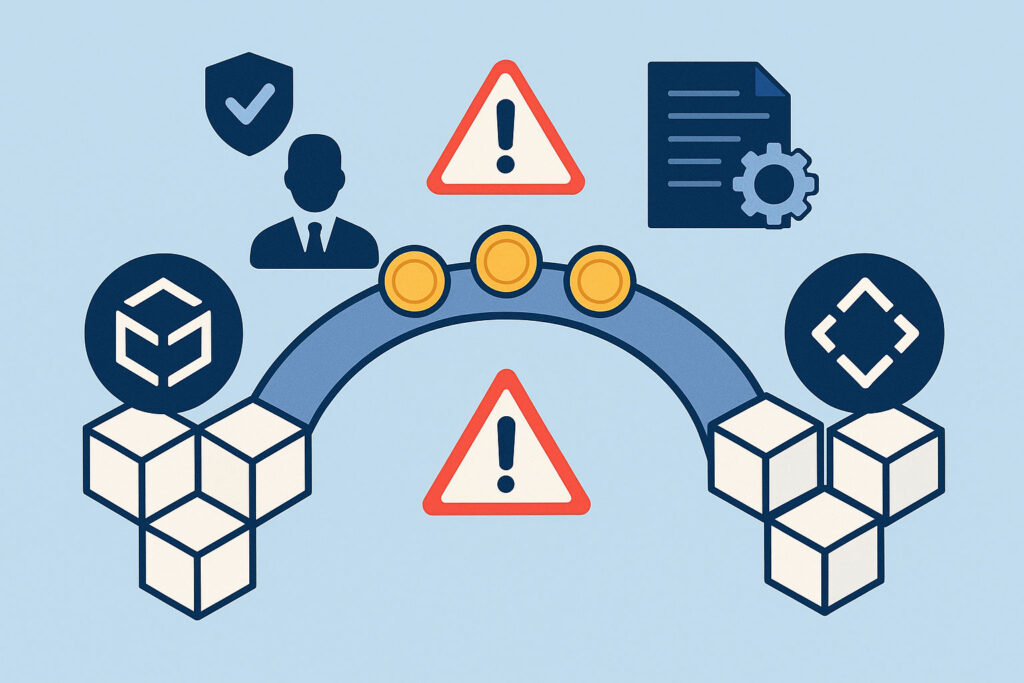
Bridges: Why Cross-Chain Moves Are So Often the Weak Link
Bridges are attractive targets because they often hold or control large sums of value, and they sit at the junction between chains. To design safer workflows, you first need a conceptual model of how they work.
How Most Token Bridges Work Conceptually
At a high level, most token bridges follow one of these patterns:
- Lock and mint: Tokens are locked in a smart contract on Chain A, and a representation (wrapped token) is minted on Chain B.
- Burn and mint: A wrapped token is burned on Chain B, and original tokens are released on Chain A.
- Liquidity network model: Liquidity providers hold balances on multiple chains and front-run transfers in exchange for fees, often relying on off-chain coordination and dispute resolution.
In all three cases, you are relying on:
- The correctness of bridge smart contracts.
- The honesty and resilience of validators, oracles, or relays.
- The economic incentives that keep liquidity aligned with user behaviour.
Failures usually happen at these trust boundaries – a compromised validator set, a bug in the cross-chain verification logic, or mispriced incentives that allow attackers to manipulate state.
Common Bridge Risk Patterns
- Smart contract exploits: Bugs in the bridge contracts let attackers mint unbacked tokens or unlock collateral fraudulently.
- Centralised control: A small multisig controls the bridge and can be coerced or compromised.
- Fake UI / phishing: Users are tricked into using a cloned bridge site that redirects their approvals and transfers to malicious contracts.
- Asset misrepresentation: Wrapped tokens on the destination chain turn out to be thinly traded or poorly backed, leaving you with illiquid assets.
- Operational confusion: Using the wrong version of a bridge, sending to unsupported chains, or mismanaging gas requirements for the return trip.
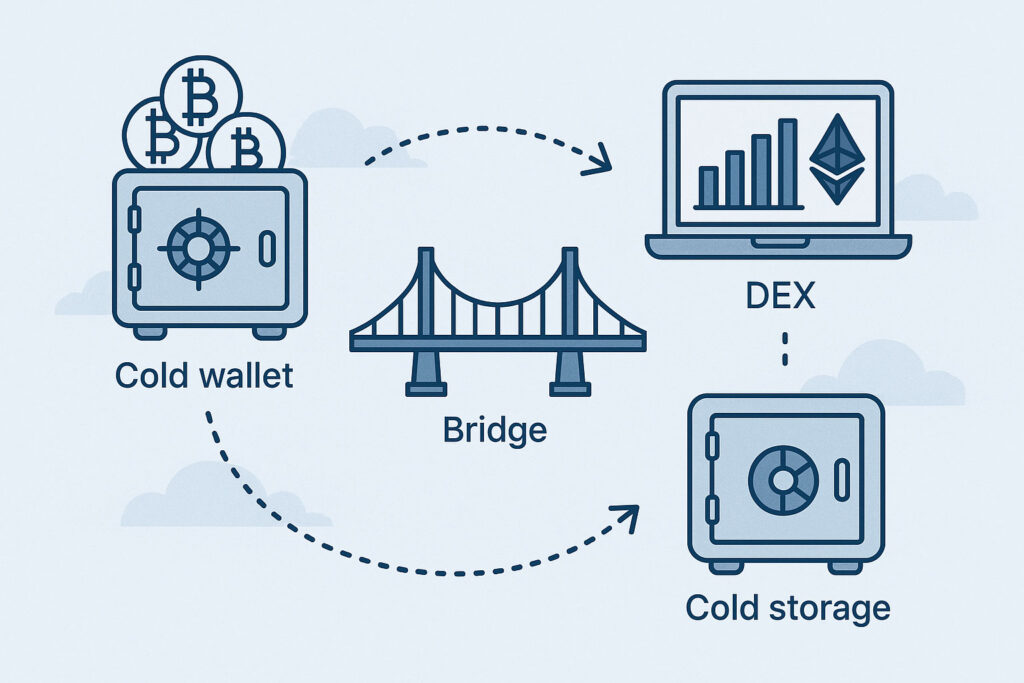
If you are bridging value that you intend to store for the long term, it is usually smarter to treat the bridge merely as a transport step, and then move assets into safer storage – using a hardware wallet and robust hot vs cold wallet differences you are comfortable with.
Safer Workflows for Using DEXs and Bridges
Knowing the theory is useful, but what you really need are concrete workflows that reduce risk without making your life unusably complicated. Below are practical patterns that you can adapt to your own setup.
Wallet Segmentation: Hot, Warm and Cold
A robust baseline is to create three tiers of wallets:
- Cold wallet: Hardware wallet, multi-sig, or other offline-centric setup. Holds long-term investments. Interacts with few contracts. Approvals are rare and carefully considered.
- Warm wallet: Used for larger trades or yield strategies, but only on trusted protocols. Limited dApp surface area.
- Hot wallet: Small balance wallet used for experimental protocols, new token launches, NFT mints and other high-risk activities.
Keep your cold wallet aligned with best practice wallet seed phrase security, and rely on your hot wallet for most DEX experiments. You can periodically refill the hot wallet from warm or cold wallets in controlled amounts.
When it comes to hardware devices, following a disciplined routine and choosing from the best wallets for cold storage can materially reduce the downside if a DEX or bridge misbehaves.
Safer Approval Patterns
For ordinary DEX usage on a hot or warm wallet:
- Use finite allowances. Approve only the specific amount (plus a small buffer) needed for your planned trade.
- Limit new DEX routers. Prefer trading through a small set of well-vetted DEXs rather than a new one for every token.
- Review contract addresses. Check that the “spender” address in the approval matches the official router address, not just the dApp’s front-end URL.
- Short-lived Permit2 expiries. If using Permit2, treat approvals as session tokens – short expiry times, refresh as needed.
These patterns add a few extra clicks, but significantly reduce the risk that a single compromised router or Permit2 allowance drains your entire balance.
Safer Bridging Patterns
For bridge usage, think in terms of “transport and exit”:
- Bridge only what you need. Move the amount required for your immediate strategy, not your whole portfolio.
- Use official or canonical bridges where possible. For large amounts, favour bridges that are the primary, well-integrated route between chains.
- Test with a small transfer first. Send a small, sacrificial amount to confirm the route, fees, and arrival process.
- Exit into safer storage quickly. After bridging into a new chain, do not leave major holdings sitting in a hot wallet – consult your own migration to cold storage tips and move them into a cold wallet.
Finally, remember that returning from the destination chain may involve different routes or bridges. Always budget time and gas for the return path, and avoid creating a situation where you hold significant funds in a liquidity-constrained wrapped asset you cannot easily unwind.
Comparing Risk Levels Across Common DEX Actions
Not every on-chain activity has the same risk profile. The table below provides an approximate risk guide to help you prioritise your attention.
| Action | Typical Value at Risk | Risk Level | Key Controls | Recommended Frequency |
|---|---|---|---|---|
| Swapping blue-chip tokens on a well-known DEX | Medium | ★★★☆☆ | Finite approvals, trusted router, regular revokes. | Daily / Weekly |
| Airdrop claiming & NFT mints on new contracts | Low – Medium (per transaction) | ★★★★☆ | Dedicated burner wallet, small balances, immediate revokes. | Ad-hoc |
| Cross-chain bridged transfer of core holdings | High | ★★★★★ | Canonical bridges, test transfers, fast move into cold storage. | Rare |
| Providing liquidity to new or experimental pools | Medium – High | ★★★★☆ | Protocol due diligence, limited allocation, exit plan. | Ad-hoc |
| Rebalancing long-term portfolio via DEXs | High | ★★★☆☆ | Use warm wallet with minimal approvals, direct routing. | Monthly / Quarterly |
Pair this perspective with well-established tips to avoid getting hacked and you get a much clearer sense of where to focus your operational discipline.
Pulling It Together: Example Workflows
Workflow 1: Trading a New Token on a DEX Safely
- Start from cold storage. Your main holdings sit in a hardware wallet you selected after reviewing the best wallets for cold storage.
- Fund a hot wallet. Send a limited amount of native gas token and stablecoins from your cold or warm wallet to a dedicated hot wallet address.
- Verify token and DEX addresses. Cross-check the token contract and router addresses from multiple reputable sources.
- Grant finite approvals. Approve only the amount you intend to swap, not unlimited allowances.
- Execute the trade. Perform the swap, then confirm your balances.
- Revoke approvals. After trading, revoke the token approval for that router unless you plan to trade it regularly.
- Extract profits. Move significant profits from the hot wallet back to warm or cold storage on a regular schedule.
Workflow 2: Bridging Assets for Yield on Another Chain
- Assess yield vs risk. Decide how much capital you are willing to risk on the destination chain, keeping in mind both smart contract and bridge risk.
- Choose the route. Prefer canonical or widely used bridges when moving significant sums.
- Dry-run the route. Send a small test transaction to validate that funds arrive correctly.
- Perform your main transfer. Bridge the intended amount, then confirm arrival.
- Deploy capital carefully. Interact with yield protocols using finite approvals and a dedicated yield wallet.
- Plan the exit. Decide in advance how you will move capital back, and what conditions (yield, risk, market moves) will trigger that exit.
- Exit to cold storage. Once the strategy is complete, move your principal and profits back through the bridge and into a cold wallet, following your established cold storage migration checklist.
Workflow 3: Consolidating Profits Back to Centralised Exchanges
At some point, you may need to move funds back to centralised platforms for fiat off-ramps or specific trading pairs. In this case:
- Route via safe wallets. Bridge from experimental chains back to your main chain first, then through a warm or cold wallet before sending to the exchange.
- Monitor exchange policies. Be aware that centralised platforms carry their own exchange withdrawal risk signals, such as withdrawal queues, KYC surprises, or abrupt policy changes.
- Minimise exchange dwell time. Keep only operational balances on exchanges and pull profits back to self-custody promptly.
Practical Checklist: DEX and Bridge Safety in Daily Use
Here is a condensed, actionable checklist you can keep next to your wallet app.
Wallet and Storage
- Use at least two wallets: a hot trading wallet and a separate cold wallet for savings.
- Ensure your seed phrase is stored according to strong wallet seed phrase security practices.
- Keep only the funds you need for active strategies in hot wallets.
Approvals and Permit2
- Prefer finite allowances to “unlimited” approvals.
- Review spender addresses before approving or signing anything.
- Set short expiry times for Permit2 approvals and treat them as session permissions.
- Run a monthly review of all token allowances and revoke anything you no longer need.
DEX Usage
- Use a small set of well-established DEXs for most swaps.
- Verify that you are on the correct network and the official front-end.
- Move significant profits out of the hot wallet into cold storage on a consistent schedule.
- Refresh yourself regularly on tips to avoid getting hacked as attacker techniques evolve.
Bridges
- Bridge only the amount you need for a given strategy.
- Use canonical or widely audited bridges for large transfers.
- Test with a small amount before moving serious capital.
- Exit into safer storage quickly on the destination chain, using your own migration to cold storage tips as a guide.
Long-Term Hardening
- Periodically reassess your wallet segmentation and whether you need an additional hardware device.
- Compare current devices and setups with the evolving landscape of the best hardware wallets for cold storage.
- Stay aware of major bridge incidents and update your mental list of trusted routes.
DEX Safety 101 FAQs
Permit2 is not inherently more dangerous than classic approve() flows. In some ways, it can be safer, because it allows protocols to implement explicit expiries and granular limits per signature. The risk is that users often treat Permit2 signatures as “just another pop-up” and do not appreciate that they can grant broad, long-lived rights. Used with short expiry times and regular reviews, Permit2 can be part of a safer DEX experience.
A monthly cadence is a reasonable baseline for an active trader, combined with event-driven reviews after high-risk interactions. If you interact with many experimental protocols, you might want to review weekly. The critical point is consistency – a predictable routine that systematically trims your exposure from old or unused approvals.
Bridges are structurally high-value targets. Even if a bridge has been operating safely for a long time, its attack surface is larger than a simple token contract. From a risk management perspective, it is better to use bridges for short-term transport and keep long-term holdings in simpler, more battle-tested storage such as cold wallets, rather than treating bridges as parking spots for large amounts of capital.
Hardware wallets protect your private key from being exfiltrated by malware or compromised devices, but they cannot stop you from authorising a bad transaction. If you approve a malicious contract, the hardware wallet will dutifully sign what you ask it to sign. That is why you need both a strong device and disciplined workflows.
If you want a minimal, high-impact starting point: create a dedicated hot wallet, move only the funds you need for active trading into it, start using finite approvals for swaps, and introduce a monthly approvals review where you revoke anything unnecessary. Over time, add more refined practices around bridging, Permit2, and cold storage migration.
Conclusion: Make Safety Part of Your Routine, Not a One-Off Project
DEX safety is not about memorising every line of a smart contract. It is about building simple, repeatable habits that reduce the blast radius when things go wrong. Approvals, Permit2, revoke workflows and bridge usage are all levers you can control – and once you align them with solid self-custody practices, your risk profile improves dramatically.
Combine disciplined wallet segmentation, finite approvals, regular revoke routines, careful bridge usage, and ongoing education around avoiding hacks as a crypto investor, and you turn DEXs and bridges from dangerous black boxes into powerful, manageable tools in your trading stack.
If you found this content helpful,please consider sharing!:
More in Cryptocurrency
